Monday, July 27, 2015

RTC - Revit Technology Conference 2015

WOOT.. directly after a lovely vacation I was whisked off to an AMAZING conference.

I had a chance to meet the original 2 men that brainstormed the program REVIT.. (Irwin Jungreis and Leonid Raiz)... they were like Apple's Steve Jobs. 
Humble and brilliant men.. It's was great. There were tons of classes which were full of great information.
I learned a lot and will be implementing these Best Practices here in the upcoming months.. so keep your eyes open.

Some of the items of interest you can expect to see:
  • Revit Project Health Checks (file reviews for best practices and performance)
  • Virtual Reality and Augmented Reality
  • Project Template Organization - file, family and view naming etc.
  • Best Practices for working with LARGE projects
  • Rhino-Grasshopper and Iterative Design (pattern based families  and adaptive components)
  • Updates to the Family Editor - to make your life easier
  • Managing Groups to reduce/eliminate group errors 
  • Behind the scenes secrets for Shared Coordinates
  • Etc. Etc. Etc.
It was a great.
It's also great to be back in the office!!! 

Tuesday, February 3, 2015

Profiles are Included in Copy/Paste


If you need to copy a system family (stair, railing, wall sweep, fascia, gutter, etc.) that has a specific PROFILE embedded, from one project to another.. you can do a copy/paste with confidence.

The system family will copy over and bring with it any profile that is embedded that helps create the shape. Your system family may ERROR when you paste it into the new project.. but the profile makes the transfer just fine.

Example: If you copy a wall sweep.. it will error because it doesn't have a wall to host to in the new project.  No biggie. Your profile made the jump and is ready to be used.

Happy Revitting

Thursday, December 4, 2014

Sketchy Lines - in Revit 2015


One of the fun features that has now been incorporated into the current version of Revit is Sketchy Lines. You can turn this feature on in any elevation, section, 3D view, etc. and it can also be set up in a View Template (example: Sketchy Presentation).

Here is how you use it:
When in any view.. simply open the Graphic Overrides for that view and expand the Sketchy Lines settings. Enable Sketchy Lines.
Try different settings for the Jitter and Extension until you get what you are looking for.

It's not SketchUp.. but hey.. we're getting the 'less refined' look that people are saying that clients really want to see.

Wednesday, November 19, 2014

Revisions

When working with revisions, the workflow is thus. You place a CLOUD around the items that have been revised and you also place a TAG directly adjacent (and touching) the cloud that gives reference to the cloud, letting people (mostly the contractor or installer) know which project revision this work is associated with. This keeps things organized.

When you issue another revision.. you must give it a separate number.. again, this keeps things organized. But, this time you must do another task. It is common practice to turn off the CLOUD from the previous revisions, but LEAVE the old revision TAGS on. This alerts people to the fact that another previous revision has occurred in this area, but doesn't cloud the issue with extra clouds laying around. haha

At first this may seem like a daunting task.. but Revit has it all figured out. 
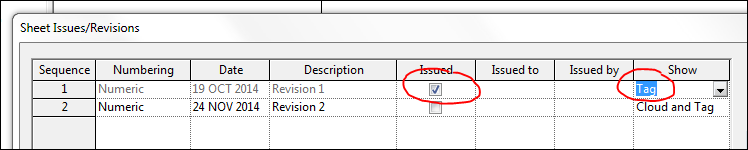
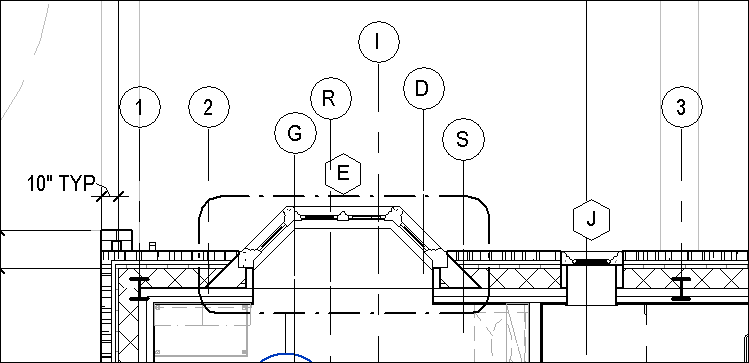
If you have been using the Revision system built into Revit (accessed by selecting Manage>Additional Settings>Sheet issues/Revisions).. the dialog and revision cloud on the drawings should look like this.


When you ADD another revision and ISSUE your first one:
First, check the box for ISSUE (this locks the revision clouds from being edited).
Second.. change the dropdown from 'Cloud and Tag' to just 'Tag'.. and all the revision clouds from the previous revisions will turn OFF but their associated tags will be left ON.


BAM.. move along. 

Wednesday, November 5, 2014

Magical Moving Grid Heads


Ever work on a project and find the Grid Heads moving on other Views when you intended them to only be moved in the current view?
Grid heads have a 3D and a 2D feature built into them.
Typically.. out of the box... they are set to 3D.. which means when moved, they will move in all other similar views (example: all the plan views). But you can switch this setting to 2D on an individual Grid Head basis in order to move the Grid Head where you need.. and this will NOT effect the other views.
Here's how:
Select the Grid line.. you will see (NEAR the Grid Head) a small annotation of '3D' or '2D'. If it is set to 3D, then by clicking on this small annotation you can switch it from 3D to 2D.. and then the Grid Head can be safely fulled to a new location. 

You can switch it back to working in 3D and connected to all the other views by aligning the 2D head to the little CIRCLE on the grid line. The 2D annotation will switch back to 3D. 

NOTE: This 3D/2D functionality works on LEVEL MARKERs too when working in Elevations and Sections!!


Wednesday, September 17, 2014

Guide Grids

Ever want to make sure your plans are aligned from one sheet to the next? Rumor has it that contractors can't build it unless the plans align exactly from one sheet to another. So, thankfully Revit has a quick easy solution for this.

Guide Grids. Yep, Automatic alignment feature built right in. (Nearly automatic anyway.)

Here's how they work:
You place them into Sheet Views (since you can't put them anywhere else).

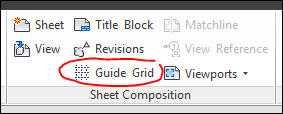
With a Sheet View opened.. Select the View tab, and in a group called Sheet Composition you will find a button labeled Guide Grid.
Click on that.


A small dialog box will appear where you can select an existing Guide Grid or make a new one. NAME it appropriately (e.g. floor plans), select OK. The Grid will appear across your entire sheet. You can then resize it (crop it basically) to the area you need it.


In the Properties of the Guide Grid you can also set the Grid Spacing from the default 1" to anything you like. 4"works great.


Place the same (floor plans) Guide Grid onto each of your Plan Sheets and move your Floor Plan VIEWS to align with the 'non-moving. non-shifting' Guide Grid. (You will find that the grid will not shift at all when you resize the grid boundaries.. so you are safe. Just move your floor plan views to align and you are good to go.)

Try it out.. its pretty cool.


Friday, August 29, 2014

Which Version is it???


QUESTION:
Is there a way to just look at a file in your directory structure and know which version of Revit was used to create it?
The answer is sadly NO.

Especially if the file is not one that has Worksharing enabled.. if that is the case, you will simply need to try to open it.
If it is an older file.. it will begin to upgrade.. it it newer.. it will warn you.. and if it matches your current Revit version,.. it will open.

Yet, there is hope... if a file DOES have Worsharing enabled (it's a CENTRAL file), there is a way to know if the file is the same version as the Revit session you currently have running... before you begin opening it.

Let me explain with an example:
If you are in Revit 2014 and are trying to create a new Local file from a Central file on your server. You select OPEN file and you browse to the file on your server. When you select the file (one click only), look at the CREATE NEW LOCAL  checkbox.. if it is highlighted with a checkbox in it.. you are good to go.. the file matches the current 2014 version. 


But, if CREATE NEW LOCAL is greyed-out and your only option is to DETACH FROM CENTRAL.. you are missmatched and it's not a Revit 2014 file (or its not a center file after all).  It could be older or newer, or a local file of Revit version 2014.. Sorry.. try again.


It's not fun when we don't know the file's version.. especially when your office is using several versions of Revit.

It pays to NAME the FILE with the Revit version in the filename.
Example: Colorado State_Admin Bldg_Exterior Envelope_R2014

Friday, August 15, 2014

Select Previous

You ever select a few items and then when switching views.. the selected items unselect?
Happens all the time.. well.. There is a solution to get them back!

Here are some screenshots to prove it.
FIRST: A couple simple items (windows) selected in plan view.


SECOND: A casual change to 3D view (could have been any other view).. and BAM, your items are conveniently unselected.


FINALLY: So here you go... CTRL + LEFT ARROW.
Yep, simply hold down the Ctrl key and hit the left arrow.. it reselects your previous selection.. better know as Select Previous.


Happy Revitting

Monday, March 17, 2014

ZOOM EXTENTS

Something very simple for you.
If you are zoomed in on the MAIN window in Revit and want to ZOOM EXTENTS.. simply double click the scroller of your scroller mouse. BAM

ZE (Zoom Extents) on the keyboard still works of course.. but this is a great little shortcut.


Wednesday, December 18, 2013

Color by Worksets


There are some options for you to help see the different Worksets visually.. and can be found by clicking this little button (across the bottom of the screen):


Worksets can be color coded visually to represent a few different scenarios:

If set to Checkout Status - you can visually see who has different Worksets checked out. We don't typically check Worksets out, so this won't help much. Just sayin'.
If set to Owners - you can visually see who owns what.
If set to Model Updates - items that have been updated since you did a Sync to central will turn a color. Also, items deleted since you did a Sync will be highlighted a different color.
If you set to Worksets - each Workset will turn a different color - giving you a quick visual.

You can set the colors by clicking on the Worksharing Display Settings...


NOTE:
One other way to visually display the worksets is a simple button I like to use. On the Worksets dialog box there is a button to 'Grey Inactive Worksets'. So make sure you are on the correct Workset (active) and then check this button.. the rest of the model goes gray. All items are still editable.

Happy Reviting


Thursday, December 5, 2013

Hide Elev Marker at Some Scales

Enlarged Plans. We create them all the time. And, just as often, we drop in an Elevation Marker to create an Interior Elevation. Well, if you simply toss in the marker with the default settings.. you will see your elevation marker in all the Floor Plans.. not just this one Enlarged Plan.

There is a way to fix this.

Select the Elevation Marker's Triangle Pointer (not the main circle) as show here in this image:


Then you can change the property under the Graphics Settings to 'Hide at scales courser than 1/4"=1'-0". That way it will NOT be on the main 1/8"=1'-0" Floor Plans, RCP's, Furniture Plans, Finish Plans, Color Presentation Plans, etc.


Good to know.. for HIDING them all (individually) would be a real pain! You will find you may not have to HIDE them anywhere.. but keep your eyes open in any other Enlarged Plans. =)


Views NOT on Sheets

Two important things for you today:

TipOne: Delete any views that are temporary or unused.
I wish this went without saying, but.. When you're in the process of working on a specific project, you are going to have to create various project views. In many situations, you are most likely going to require hundreds of various views for a building that is complicated and large (typical). You should always look through your views and try to find any that you have originally created for visual and temporary reasons (that you are not using any longer).. and delete them. Not only is this going to result in your project being leaner, meaner and cleaner.. but it will also increase file performance speeds.

TipTwo: Quickly View all views NOT on Sheets.
You already know that if an Elevation, Section or Callout view is NOT on a sheet, it will NOT have a detail/sheet number reference. But if you want to quickly SEE which views are not on sheets (in the Project Browser).. Switch the 'filter' of your Project Browser.

Here's How: Select  View>User Interface>Browser Organization


Switch the Browser Organization for Views to 'not on Sheets'. Once this is done.. your Browser will ONLY show views that are NOT on Sheets. You can then see if you have accidentally not placed a detail (or other view) that was supposed to be part of the Drawing Set. And you can easily open views to see if they are needed any longer.. good candidates for deletion/ retirement.

*NOTE: Don't' forget to switch your Browser Organization back to normal! Whatever 'normal' is for you.


Monday, January 28, 2013

Using GROUPS rather than Design Options

There are many great uses for GROUPS in Revit. I just discovered another one. If you have a design decision to make and are unsure of which way the client will go, so you decide to use Design Options.. HOLD EVERYTHING. There is a much simpler way to do it.

Create a group, let's say an arrangement of furniture. Move the group's insertion point to a known location.. like the corne of a room or in this case, the corner of the fireplace. (The insertion point is the little x/y axis that shows up when you select the group.. it's dragable).


Then delete the group! Yep.. just hit delete. (it stores in the project, trust me)

Now, create another group.. with another furniture arrangement. Move this new group's insertion point to the same location as the first group.


Now you are ready for the magic. Simply select the group and swap it out (in the properties dialog box) for the other one. BAM. Works like a champ. The insertion point holds the group's location. So for a quick design decision.. you don't have to set up Design Options if you don't want to.

There seems to only be a couple drawbacks. You can't set up a view where one of the groups is visible and another view where the other 'swapped out' group is visible. So it's a manual process. The other drawback is that the groups, when swapped out, don't retain any visual overrides.

Other than that.. this is the way to go!

Monday, January 21, 2013

Visibility Control

Ok.
Some confusion exists between the different visibility control mechanisms we have in Revit.
And it's no wonder.. There are so many possible combinations that it takes real skill to keep them all organized.

Here are the main ones that are giving people issues.. there are others to help complicate things, but we'll start with these:

  1. You can select an individual object and with a right click - select Graphic Override, and make it look any way you want.
  2. You can also select any individual object and with a right click - Hide it or the entire category in which it belongs.
  3. Categories give you the ability to make an entire category look any way you want (and the ability to turn an entire category on/off).
  4. Worksets gives you the ability to group items (even from different categories) and turn them on/off.
  5. Filters give you the ability to make your worksets (and other items) look any way you want them. (All grey, All dashed and light blue, etc.).
  6. Phases give you the ability to tell items when they were created and when (if at all) they will be demolished.
  7. Phase Filters give you the ability to make a graphic distinction between new and existing phases (Grey Existing, Dark New, Existing Off, etc.)
Now that should make things as clear as mud.

Friday, October 12, 2012

View Range - the mystery solved!


OK.. I finally have a grasp on the settings of the VIEW RANGE. They have eluded me for quite some time.. but I finally got it. So here you go.

There are 4 settings. TOP, CUT, BOTTOM and VIEW DEPTH.

Well, as it turns out, the only 2 you need to pay attention to is the CUT and BOTTOM. The other two are for special viewing needs.

First, the values must always be in ascending order.. meaning the VIEW DEPTH will always be the lowest value and TOP will always be the highest value. (duplicate valuses are allowed.)

Next, CUT is just that.. it cuts thru things. Certain elements can't be cut thru though (furniture, specialty equiptment, etc.) and will always show their top surface.

BOTTOM is the base of your view.. so you can't see past that. Stairs are an exception, they will show the steps below because they 'started' in your view range.

OK.. if you for some reason want to see things that exist ABOVE the CUT.. you must lift the TOP to either intersect or pass them. The only caveat is.. it only works on Windows, Casework and Generic Models.  Weird, but that's the skinny.

Lastly.. if you for some reason want to see things that exist BELOW the BOTTOM.. you must lower the VIEW DEPTH to either intersect or pass them. This works on all objects. They will be visible and will be using the linestyle named 'beyond'. Which can be set to any line style you want (solid, dashed, etc.). The only weirdness here is, some families have thier own special rules with respect to the CUT PLANE. Example: floors will turn on if within 4' of the VIEW DEPTH value. 

So it's less of a science.. it's more like artwork.

Enjoy.

(We'll talk about Reflected Ceiling Plans later!)


Friday, September 28, 2012

Sites - SketchUp to Revit


Part of our current workflow is to create a schematic model in SketchUp - which often includes the site.  Many client meetings occur as the team is busy convincing them of our great design.. Once they make a decision on a direction to proceed.. we often turn the SketchUp model into a Revit model to take the design to the next level.
We don't need to scrap the entire SketchUp model to proceed. The buildings need to be recreated using Revit geometry.. but the site can be used to create one in Revit. Often we use geographical topo data from the civil engineers, but we can also use the SketchUp model site.
Here below is a quick shot of a sample Sketchup site. It may have roads, sidewalks, etc on it. We need to isolate the site by turning off (hide) all buildings, entourage, etc.  Then export to DWG.
Linking the DWG into Revit and then using the Site>Toposurface tools, we can generate a full 3D site inside Revit. It takes a little gymnastics to get the roads and walks separated to sub-regions.. but we have to do that with the geo data from civil also.  We can then control the materials in Revit for our construction documents and renderings.

So there you have it. You can use the SketchUp site and turn it into a Revit site for your next project.

Monday, April 25, 2011

Controlling Visibility of Individual Wall Layers

Sometimes it is desirable to hide individual layers of a wall while leaving other layers of the same wall visible. For example, when a structural engineer links an architect’s Revit file, the structural engineer may not want to show the rigid insulation, sheathing, masonry veneer and other nonstructural parts of the wall.

It is now possible in the 2012 release of Revit to control the visibility of individual layers of the wall. This can be accomplished by using the new ‘Parts’ tool. After creating parts for each of the layers in a wall, you can hide the layer part (or layer). ‘Parts’ is a new model category in Revit.

Wednesday, February 2, 2011

Empower the "I" in BIM

Have you ever had the need to transfer your BIM data between Autodesk Revit and Microsoft Excel? Quite often, it is better to use the power of a spreadsheet application to manipulate your data. You now have the ability to transfer data back and forth between Revit and Excel using the Ideate BIMLink extension.

For more information about BIMLink, go to http://www.inlettechnology.com/Ideate_Products.html.

Download a trial version and try it out yourself! I think you will find this extension has many possibilities.

Monday, January 24, 2011

Developing a Strategy for Your BIM Implementation

Building Information Modeling (BIM) is a process involving the representation of the physical and functional characteristics of a building in digital form. By using the BIM approach, it becomes possible to streamline processes, improve coordination and simulate construction, which facilitates more reliable decision making for the planning, design, construction, operation and maintenance of buildings.

The implementation of a BIM approach for your organization and for specific projects requires careful planning and consideration. The transition to BIM is a revolutionary process change with challenges, risks and benefits. A well-structured plan can help identify the challenges in advance, minimize risk and increase benefits. Your transition to BIM must consider your goals and uses for BIM, your BIM project execution process, information exchanges and supporting infrastructure for your BIM implementation.

The “BIM Project Execution Planning Guide” provides a structured approach for developing your plan. A team at the Penn State University Computer Integrated Construction (CIC) Research Program authored the guide with assistance from advisors representing the buildingSMART allianceTM and AEC firms throughout the United States. This collection of BIM experience will provide you and your organization with a firm foundation upon which you can develop your plan. The guide is available for download at http://www.engr.psu.edu/ae/cic/bimex/.

Monday, January 17, 2011

Maintaining Linked Revit Files in an Unloaded State

When working with a Revit file that has linked Revit files, you may decide to unload one or more of the linked files to help improve file performance. This will not be an issue until you enable Worksharing on your Revit file. After you enable Worksharing, Revit does not maintain the unloaded state of the linked Revit files in your local file when you ‘Synchronize with Central’ or ‘Reload Latest’.

You can maintain the linked Revit files in an unloaded state by doing the following:

  • Create a Workset for each of the linked Revit files and place the linked Revit files in the Workset created for that linked file.
  • Go to the Worksets dialog box and ‘Close’ the Workset that you want to unload and keep unloaded after you ‘Synchronize with Central’ or ‘Reload Latest’. Closing the Workset will unload the linked Revit file contained in the Workset.